DIY Papier-Mâché Witch Hats

A simple Halloween craft for a beautiful home. Three curled hats in cream, charcoal and rust, made from poster board, cardboard and newspaper.
Time: about 1 hour of work, plus drying Skill: beginner Cost: mostly things you already have

Store-bought witch hats tend to be shiny, floppy and very orange. These are different. They're sturdy, a little textured, and painted in the same warm tones as the rest of a fall home, so they sit happily on a mantel or a kitchen table well past October 31.
The best part is the curl. A bit of crumpled foil at the tip gives each hat that crooked, storybook bend, and the papier-mâché locks it in place. Once you've made one, the second and third go much faster.
What you'll need
Poster board (one sheet per hat)
Thin cardboard for the brims
Aluminum foil
Masking tape
Scissors and a pencil
A dinner plate or large bowl to trace
Newspaper, torn into strips
Flour and water, or white glue and water
Acrylic paint in cream, black and burnt orange
A wide brush and a small detail brush
Ribbon: burlap, velvet or both
Faux berries, mini pinecones or silk leaves
Hot glue gun
1
Step one
Form the cone and brim
Roll a sheet of poster board into a tall cone. Aim for a base about 7 to 8 inches across and a height of 10 to 12 inches. Tape the seam inside and out, then trim the bottom edge so the cone stands flat.
For the brim, trace a dinner plate onto cardboard and cut it out. Set the cone in the middle, trace around its base, and cut out that inner circle about half an inch smaller than your line. Snip small tabs into that half inch and fold them up. They give you something to tape the cone to.

2
Step two
Tape it together and add the curl
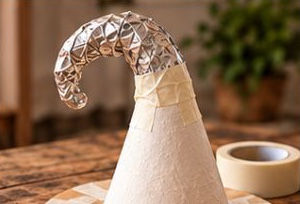
Slide the brim down over the cone and tape the folded tabs to the inside. Then tape over the outside joint as well. Cover every gap: papier-mâché needs a solid surface to grab onto.
Now the fun part. Scrunch a long sausage of aluminum foil, about 6 inches, and bend it into a hook. Tape it to the tip of the cone so it flows out of the point. Wrap masking tape around the join until the foil and cone feel like one piece. Make each hat's curl a little different.
Tip: Lay masking tape over the whole brim too. It smooths out the cardboard edge and helps the first layer of paper stick.
3
Step three
Mix your paste
Tear newspaper into strips about 1 inch wide and 4 to 6 inches long. Tearing, not cutting, leaves soft edges that blend into each other. Then pick a paste.
Two easy pastes
Flour paste | 1 part flour to 1 part water, whisked until smooth like pancake batter. Add a pinch of salt to help prevent mold. |
Glue paste | 2 parts white school glue to 1 part water. It dries harder and doesn't smell, but costs a bit more. |
4
Step four
Layer the papier-mâché
Dip a strip into the paste, slide it between two fingers to remove the excess, and lay it on the hat. Overlap each strip a little and smooth it flat with a brush. Work from the brim up to the tip, and wrap short strips around the curl so it's fully covered.
Add 2 to 3 thin layers in total. Thin layers dry faster and crack less than a few thick ones. Let the hat dry completely between layers, usually overnight. It's ready when it feels hard and sounds hollow when you tap it.
Tip: Alternate the direction of your strips with each layer. It makes the hat noticeably stronger.

5
Step five
Paint in warm fall colors
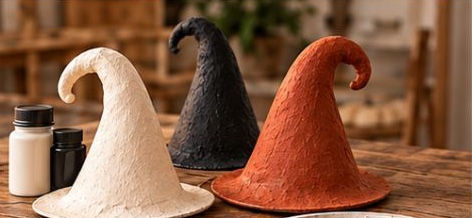
Once the hats are completely dry, paint them. Start with a base coat to cover the newsprint, then add a second coat for full color. Don't try to hide the texture. The little ridges and overlaps from the paper are what make these look handmade and expensive.
Antique creamSoft charcoalBurnt orange
For more depth, dry-brush a slightly lighter shade over the raised texture once the base is dry. Load a brush, wipe most of the paint off on a paper towel, and skim it lightly across the surface.
6
Step six
Style and display
Wrap a wide ribbon around the base of each cone where it meets the brim, and secure it with a dot of hot glue at the back. Tie a separate bow and glue it to the front, letting the tails trail over the brim.
Mix your textures. Rough burlap looks lovely on the cream hat, while soft velvet makes the darker hats feel richer. Then tuck in a sprig of faux berries or a few oak leaves next to the bow.
Group the three together on a table runner with a few candles, acorns and a vase of dried hydrangeas, and enjoy.

A few final tips
Plan for drying time. Start a few days before you want to decorate. Most of the time is spent waiting for layers to dry.
Make different sizes. A tall, medium and short hat look more natural as a group than three of the same height.
Seal for longevity. A coat of matte sealer protects the paint so the hats can come out again next year.
Get the kids involved. Layering the strips is messy, satisfying and easy for small hands.

Comments