Wood Rounds to Rustic Pumpkins

A weekend DIY you can finish in an afternoon
Some of my favorite fall decorations cost almost nothing to make. These rustic pumpkins start as plain wood slices from the craft store and end up looking like something you'd find at a farmhouse market.
Each pumpkin uses three wood rounds, a little paint, and whatever twine, ribbon, or berries you already have in your craft bin. No two come out the same, which is half the fun. Make one for a side table or a whole patch for the mantel.

Supplies
Wood rounds (3 per pumpkin)
Orange acrylic paint
White or cream acrylic paint
Dry brush (a stiff, flat bristle brush)
Hot glue gun & glue sticks
Small stick or cinnamon stick for the stem
Spanish moss (optional)
Jute twine or raffia
Ribbon, fabric scraps, wooden leaves, berries, or other embellishments
1 Dry Brush the Wood Rounds

Paint three wood rounds for each pumpkin: two in orange and one in white or cream. The trick here is to use very little paint. Dip just the tips of your brush, wipe most of it off on a paper towel, then lightly drag the brush across the surface.
Dry brushing catches the raised rings and leaves the grooves bare, so the wood grain shows through. That texture is what gives these pumpkins their rustic, weathered look.
Tip Build the color up in thin passes. You can always add more paint, but it's hard to take away.
2 Create the Pumpkin Shape

Once the paint is dry, lay the rounds out: the two orange pieces side by side with edges overlapping, and the cream round in front, centered over the seam. Play with the arrangement until it reads as a plump pumpkin.
Glue the pieces together with hot glue. Before the glue sets, stand the pumpkin up on its bottom edge and nudge the rounds so they all touch the table. That way the finished pumpkin will stand on its own.
3 Add a Stem
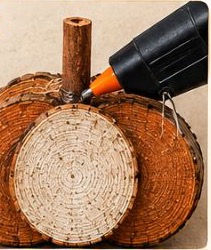
Hot glue a small stick or a piece of cinnamon stick to the back of the pumpkin at the top center. Tuck it into the little dip between the wood rounds so it looks like it's growing out of the pumpkin.
Tip A cinnamon stick works great and makes your pumpkins smell like fall too.
4 Add Texture

Tuck a small amount of Spanish moss around the base of the stem and secure it with a dab of glue. It hides any glue strings and gives the pumpkin a softer, more natural look. A little goes a long way, so start with a pinch and add more if you need it.
5 Embellish

This is where each pumpkin gets its own personality. Finish yours with any mix of:
Jute twine or raffia bows
Ribbon or fabric scraps (plaid, burlap, and lace all look great)
Wooden leaves
Berries or other fall accents
Layering different textures and colors gives each pumpkin a unique, cozy look. Try a plaid ribbon with orange berries on one, then lace and burlap with a carved wooden leaf on the next.
Finished!

A few wood rounds, a little paint, and some simple embellishments turn into the sweetest rustic pumpkins for fall decor. Group them on a mantel, tuck them into a tiered tray, or line them along a windowsill with a lantern. They also make easy hostess gifts for Thanksgiving.
If you make a batch, mix up your color combos. Two orange and one cream is the classic, but all-cream or a sage green round in the front looks lovely too.

Comments